TPMS simulator v6.0 / v7.0 for Suzuki vehicles, from IRON GATES
The TPMS simulator replaces one, two, three or all four tyre pressure sensors that equip Suzuki vehicles manufactured after the year 2013 to be sold in the European Union market.
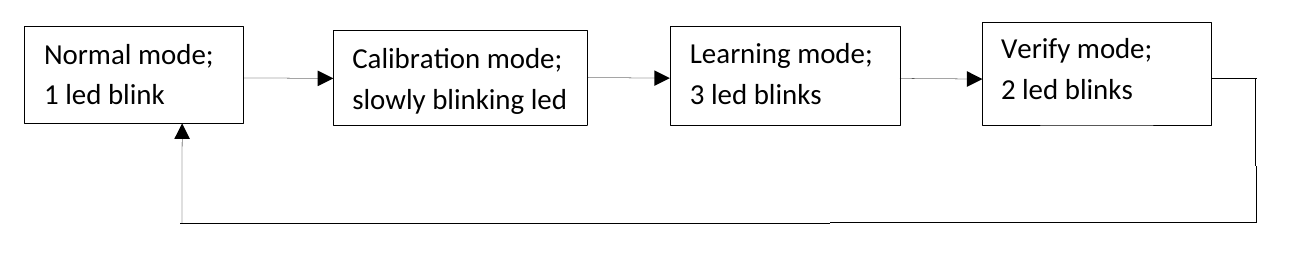
There are now two super-modes of operation. Each time the device is turned on it starts in the other super-mode. The main one is described in these instructions, the other one – auxiliary – is intended as a helper for step 4 below and is described at youtu.be/snEE_KUcVjE. I do not recommend bothering with it unless you are having a hard time completing step 4 below. The auxiliary super-mode will have different blinking patterns for its states. Check you are in the main super-mode by going through the state diagram of operating modes below. Going from one mode to the next is made sequentially as the arrows depict and it is accomplished by pressing the smaller and usually black button. The device always starts in normal mode.
Setup instructions
- Make sure the “Service TPMS” error is displayed on the dashboard screen. If you do not have it drive around until it shows up, afterwards stop the engine for at least 20 minutes.
- Head down towards a mostly straight road section, having no traffic lights, on which driving at a constant 50 km/h (31 mph) for some 4 or 5 minutes is practical. Turn on the device only after you have arrived to this place! Do so by pressing the bigger and usually red button or by plugging it into the 12 V socket in the boot. Have it seated at the far right-hand corner inside the boot of the vehicle, as close to the wheel as possible, preferably straight above the wheel; the module’s movements while the car is in motion need to be restricted, therefore it needs to be tied down. Use one of the boot’s two luggage trays with the three hook tape pieces included in the package in order to form a velcro fixture: secure the two lugs of the casing with the two short straps and slide the long strap over the middle of the casing, in parallel with the other two. The luggage tray is going to act as the loop and together with the hook tape pieces will form a hook and loop fixture. This will be the module’s permanent operating place.
- This step is now optional as the devices come pre-calibrated; skip it, do not skip step 5! Press the small button once for the device to switch into calibration mode (see the diagram above); the module will do nothing but blink for the first 30 seconds; during this time frame the vehicle needs to be set in motion, so when the 30 seconds mark has been reached (and the actual calibration process begins) the vehicle must be in motion, and over the next 30 seconds the actual calibration will be taking place. During this second interval of 30 seconds, speed must be maintained over 5 km/h. You can make use of the triangle light on the dashboard for an easy counter. It blinks once a second. After the calibration minute has passed the devices automatically switches into learning mode(all operating modes can also be reached by pressing the small button). Continue driving.
- It will take another 2 or 3 minutes (about 2.2 km / 1.4 miles driven over a straight road section, autopilot on; the distance and the driving time may increase if there is no autopilot on your vehicle, if the road is not as straight or if the traffic imposes braking and accelerating). When the autopilot is missing just maintain the cruising speed as close as possible to 50 km/h (31 mph) using the gas pedal. After this time frame the vehicle learns the new TPMS simulated IDs and the dashboard clears, turning back to white. If the error does not clear over 5 km of cruising at 50 km/h (31 mph) go to step 5, then when all is fine at step 5 redo step 4, but only after a break of at least 20 minutes with the engine turned off.
- Quit driving and press the small button until the device blinks its led twice entering verify mode – usually only one button press needed. Watch the device for one minute; if the led stays off then calibration has succeeded. If during this time the led turned on, then redoing steps 2 and 3 is necessary. The device automatically goes into normal mode after this verification minute; it will blink once as an indication (all operating modes can also be reached by pressing the small button)
- When everything is set up, it is best to put the device in normal mode, especially if it is battery powered. Otherwise the batteries will drain in around 2 months.
Troubleshooting and returning the device
- If the message “Low Tire pressure” shows up while driving, after you have successfully set up the device, pull the vehicle over to a side and set the TPMS mode to “Comfort” from the dashboard menu.
- If the TPMS error dash lights do not turn off as soon as the dashboard turns white from the previous yellow error state, restart the engine and the dashboard lights will be gone.
- Recalibration (step 3) is likely to be required on replacing the tyre with a new one. It might be needed as well with the same tyre after some 3 – 4 years of use. It is typically not needed on moving the device down to a lower luggage tray (closer to the wheel), but it will likely be needed when moving it upwards (farther from the wheel).
- When alternating between different ID sets (i.e. real sensors and simulator) the vehicle will forget the simulated IDs, a relearn is necessary: turn off the device, then do steps 2 and 4. In most cases this will happen when switching from summer tires and real sensors to winter tires and simulator.
When you are alternating between the simulator and real pressure sensors it is recommended to open the simulator device and take out the batteries. Their life will be noticeably extended.
In the event of not being able to make it work please visit the website https://spooftpms.com – “Contact” section for assistance. I’ll be answering in English and Romanian. There is also one year of warranty for the device.
Returns for any reasons are accepted within 60 days of receiving the device. The device must be in operational condition and physically not damaged. It should be noted that the return fees are at customer’s expense.